tutorials
Step 11: Assign Multiple Targets
In this step, we will add a new button to the home page to illustrate the usage of multiple targets for a route. When the button is pressed, a new page opens that contains two parts: a header part at the top and a content part. The content part displays a table of employees that can be sorted and searched. We will use the array notation in the routing configuration to assign multiple targets to a route - a feature that we have not yet introduced.
Preview
New button Show Employee Overview

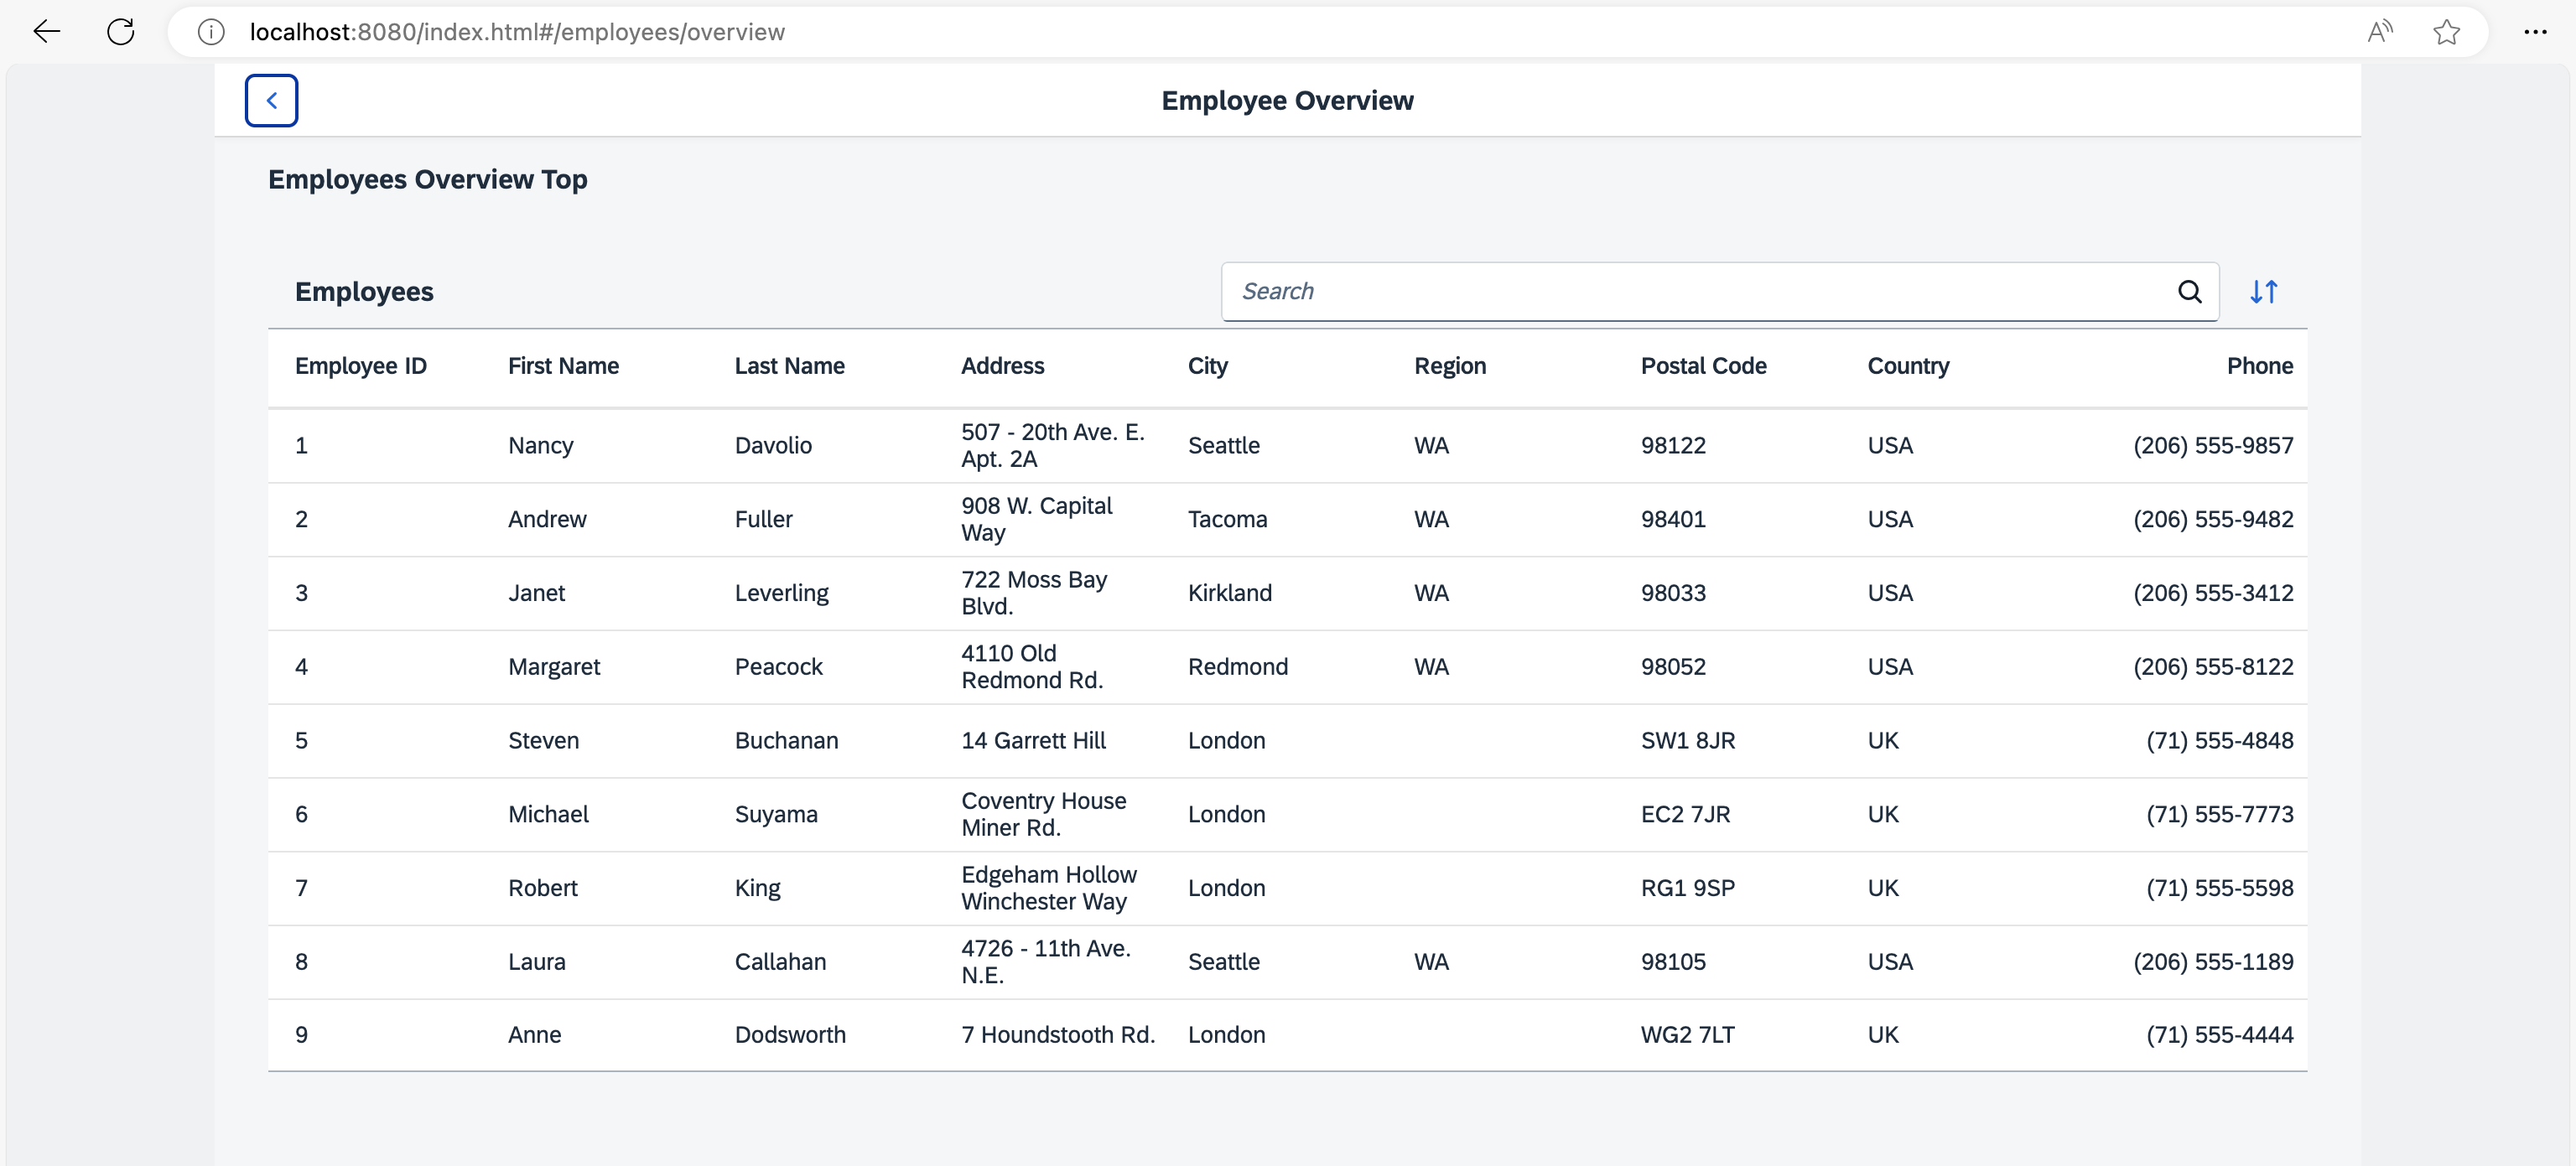
Employee Overview with search field
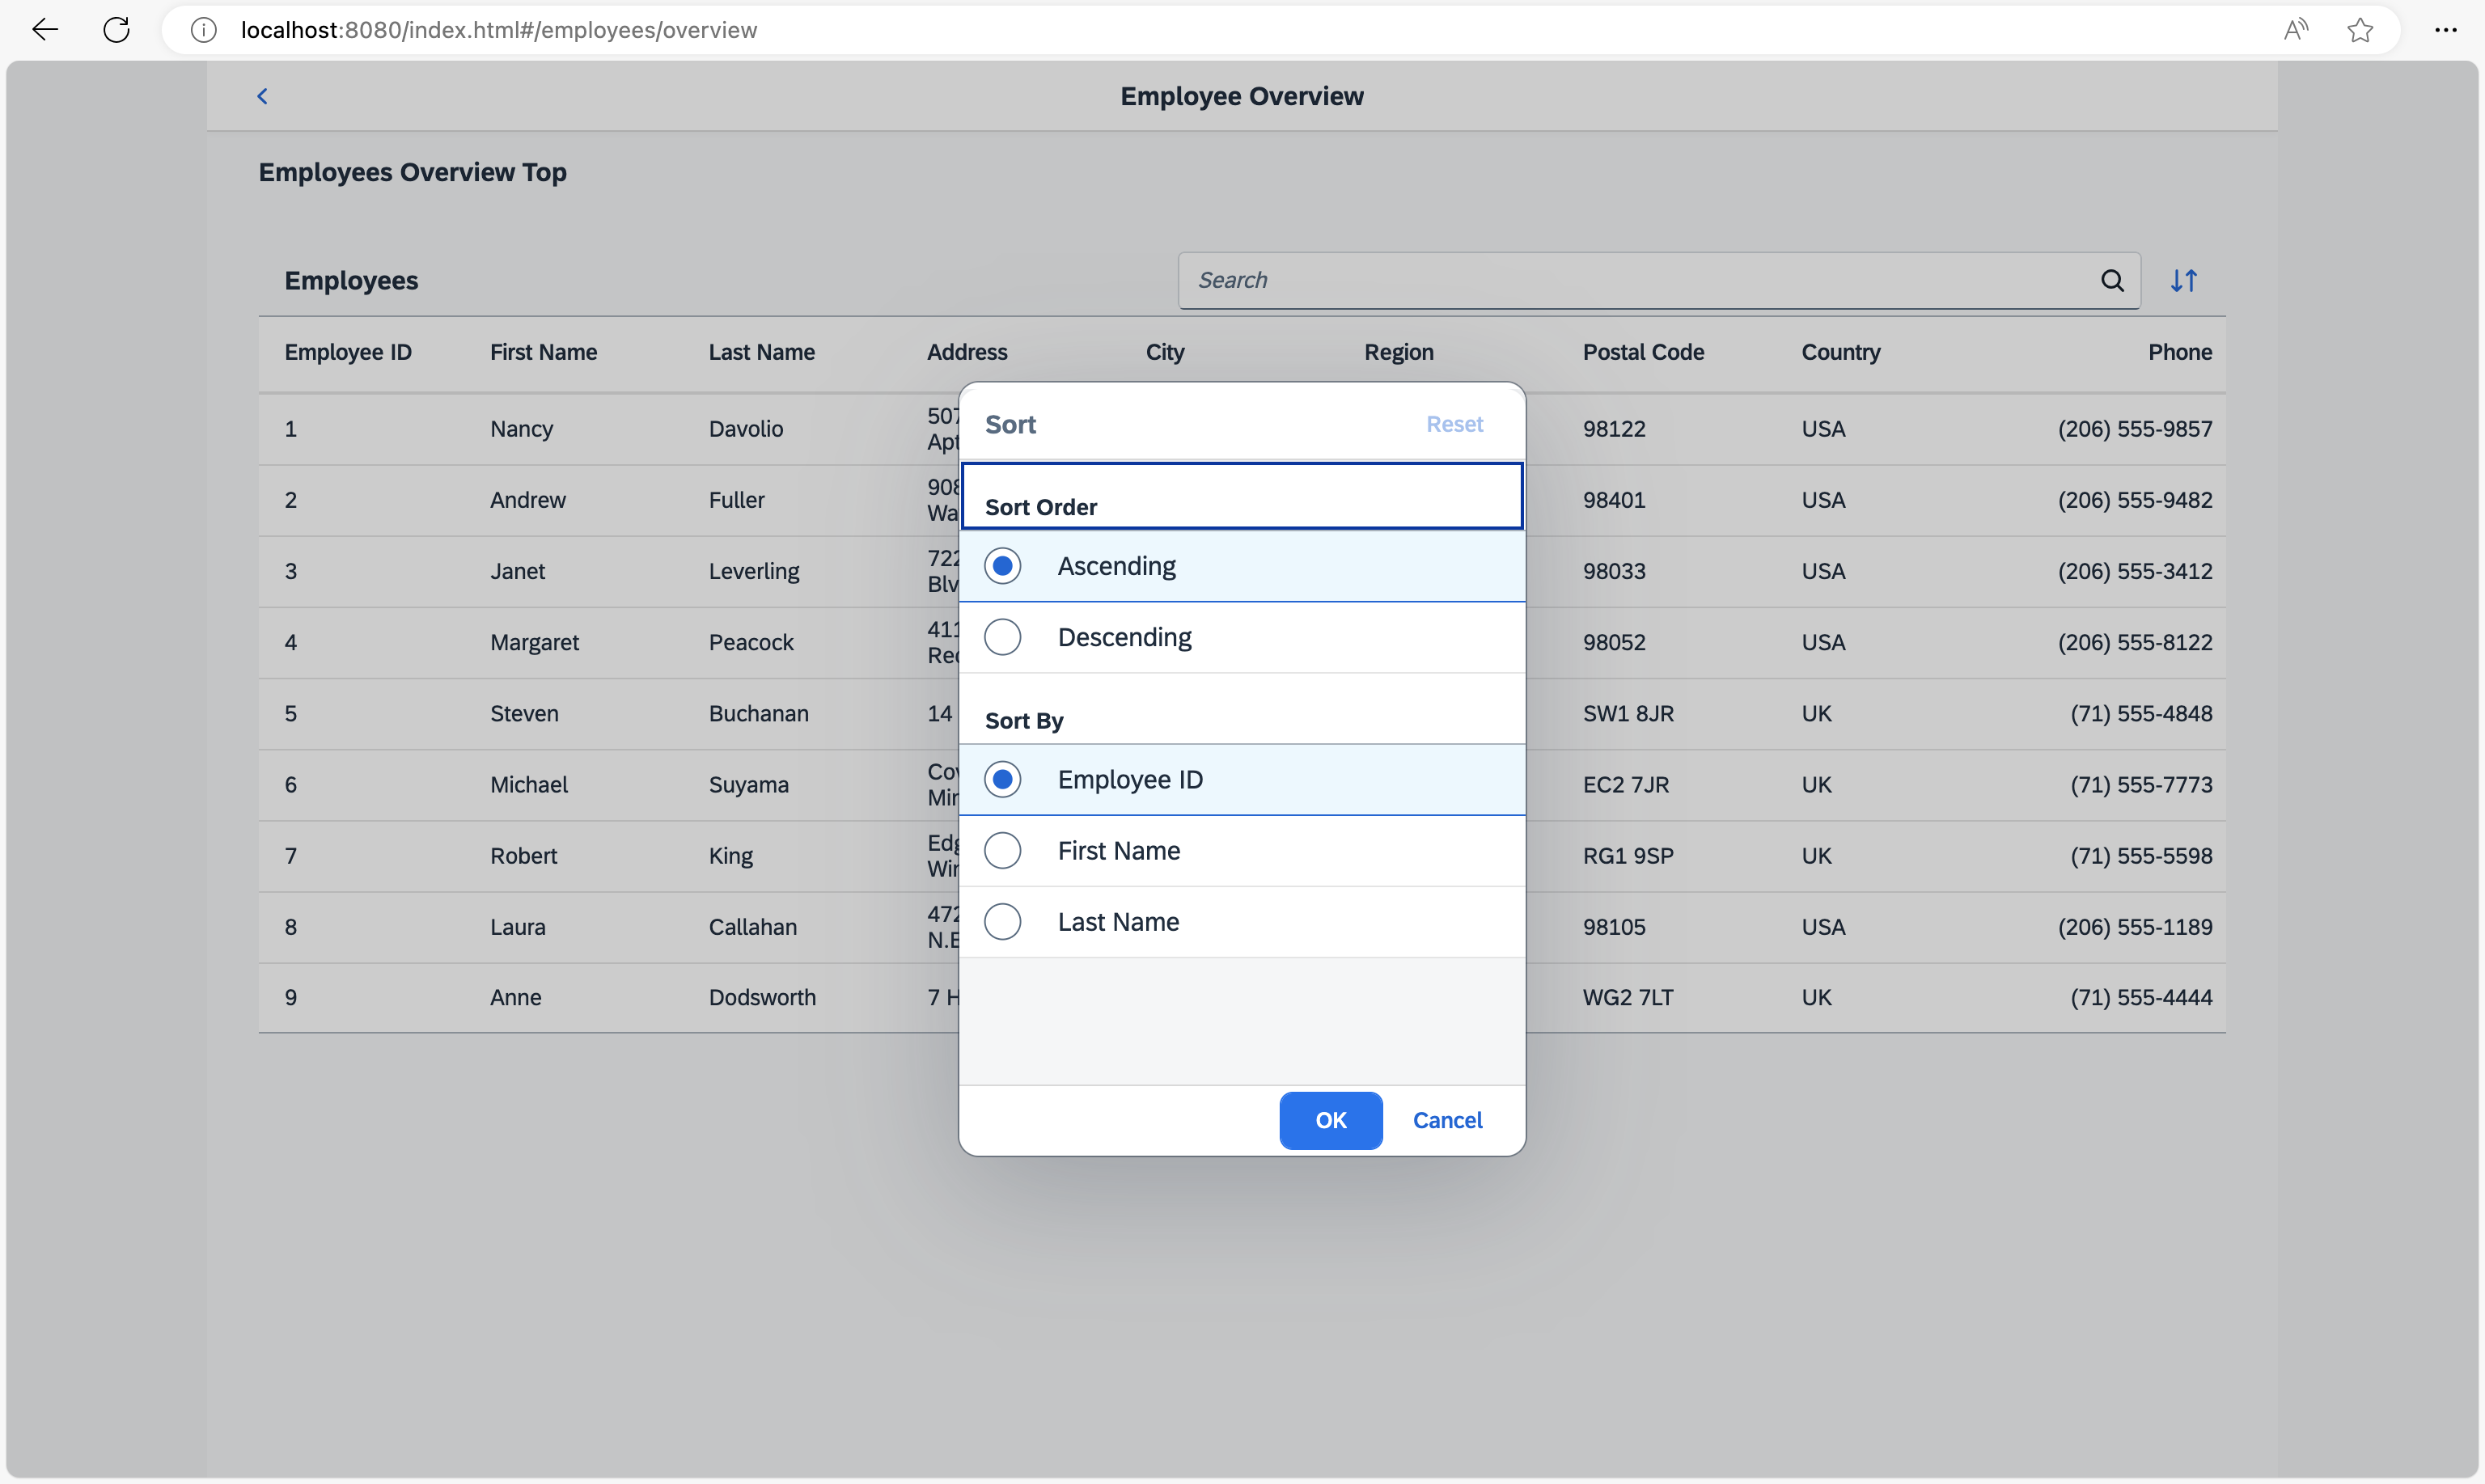
Sort options for the Employee Overview
You can view this step live: 🔗 Live Preview of Step 11.
Coding
You can download the solution for this step here: 📥 Download step 11 (TS)📥 Download step 11 (JS).
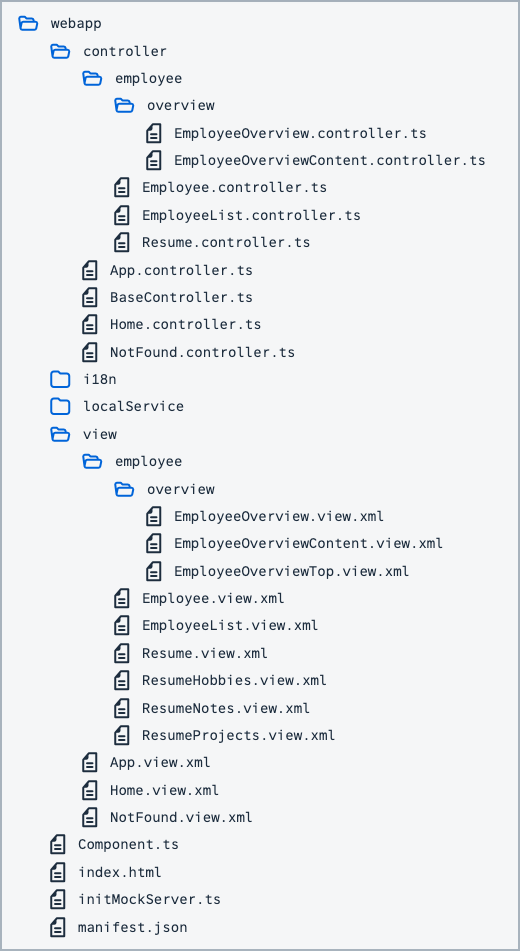
Folder Structure for this Step
webapp/view/Home.view.xml
<mvc:View
  controllerName="ui5.tutorial.navigation.controller.Home"
  xmlns="sap.m"
  xmlns:mvc="sap.ui.core.mvc">
  <Page
    title="{i18n>homePageTitle}"
    titleAlignment="Center"
    class="sapUiResponsiveContentPadding">
    <content>
      <Button id="displayNotFoundBtn" text="{i18n>DisplayNotFound}" press=".onDisplayNotFound" class="sapUiTinyMarginEnd"/>
      <Button id="employeeListBtn" text="{i18n>ShowEmployeeList}" press=".onNavToEmployees" class="sapUiTinyMarginEnd"/>
      <Button id="employeeOverviewBtn" text="{i18n>ShowEmployeeOverview}" press=".onNavToEmployeeOverview" class="sapUiTinyMarginEnd"/>
    </content>
  </Page>
</mvc:View>
First we add a new button to the Home view and add an event handler for the press event.
webapp/controller/Home.controller.ts/.js
// webapp/controller/Home.controller.ts
import BaseController from "ui5/tutorial/navigation/controller/BaseController";

/**
 * @namespace ui5.tutorial.navigation.controller
 */
export default class Home extends BaseController {
	...
	public onNavToEmployees(): void {
		this.getRouter().navTo("employeeList");
	}

	public onNavToEmployeeOverview(): void {
		this.getRouter().navTo("employeeOverview");
	}
}
// webapp/controller/Home.controller.js
sap.ui.define(["ui5/tutorial/navigation/controller/BaseController"], function (BaseController) {
	"use strict";

	const Home = BaseController.extend("ui5.tutorial.navigation.controller.Home", {
		onDisplayNotFound() {
			// display the "notFound" target without changing the hash
			this.getRouter().getTargets().display("notFound", {
				fromTarget: "home"
			});
		},
		onNavToEmployees() {
			this.getRouter().navTo("employeeList");
		},
		onNavToEmployeeOverview() {
			this.getRouter().navTo("employeeOverview");
		}
	});
	return Home;
});
As you know already from the previous steps, we add the press event handler onNavToEmployeeOverview. It navigates to the route employeeOverview which does not exist yet, so let’s create it.
webapp/manifest.json
{
  "_version": "2.8.0",
  "sap.app": {
    ...
  },
  "sap.ui": {
    ...
  },
  "sap.ui5": {
    ...
    "routing": {
      "config": {
        "routerClass": "sap.m.routing.Router",
        "type": "View",
        "viewType": "XML",
        "path": "ui5.tutorial.navigation.view",
        "controlId": "app",
        "controlAggregation": "pages",
        "transition": "slide",
        "bypassed": {
          "target": "notFound"
        }
      },
      "routes": [{
        "pattern": "",
        "name": "appHome",
        "target": "home"
      }, {
        "pattern": "employees",
        "name": "employeeList",
        "target": "employees"
      }, {
        "pattern": "employees/overview",
        "name": "employeeOverview",
        "target": ["employeeOverviewTop", "employeeOverviewContent"]
      }, {
        "pattern": "employees/{employeeId}",
        "name": "employee",
        "target": "employee"
      }, {
        "pattern": "employees/{employeeId}/resume:?query:",
        "name": "employeeResume",
        "target": "employeeResume"
      }],
      "targets": {
        ...
        "resumeTabNotes": {
          "id": "resumeNotes",
          "parent": "employeeResume",
          "path": "ui5.tutorial.navigation.view.employee",
          "name": "ResumeNotes",
          "controlId": "notesTab",
          "controlAggregation": "content"
        },
        "employeeOverview": {
          "id": "employeeOverview",
          "path": "ui5.tutorial.navigation.view.employee.overview",
          "name": "EmployeeOverview",
          "level": 2
        },
        "employeeOverviewTop": {
          "id": "employeeOverviewTop",
          "parent": "employeeOverview",
          "path": "ui5.tutorial.navigation.view.employee.overview",
          "name": "EmployeeOverviewTop",
          "controlId": "EmployeeOverviewParent",
          "controlAggregation": "content"
        },
        "employeeOverviewContent": {
          "id": "employeeOverviewContent",
          "parent": "employeeOverview",
          "path": "ui5.tutorial.navigation.view.employee.overview",
          "name": "EmployeeOverviewContent",
          "controlId": "EmployeeOverviewParent",
          "controlAggregation": "content"
        }

      }
    }
  }
}
We extend our current routing configuration with a new route employeeOverview. Note that this route has to be configured before the employee route, else the employee route would be matched with a hash like /#/employees/overview. The new route employeeOverview references two targets at the same time with an array notation: employeeOverviewTop and employeeOverviewContent. As you can see here, a route can reference an arbitrary number of targets that will be displayed when the route is matched.
Both targets employeeOverviewTop and employeeOverviewContent reference the target employeeOverview as their parent target because we want to place them both inside the parent. Please also note that we also introduce a new layer overview in the path property.
📝 The order of the routing configuration matters here, because the router stops matching additional routes when the first match is found. You can override this behavior if you set parameter
greedytotrueon the route. Then the route will always be matched when the pattern matches the current URL, even if another route has been matched before. Thegreedyoption comes from the underlyingCrossroads.jslibrary, a popular routing library. A common use case for usinggreedyis configuring targets without views and then listening for route-matched events.
Now we create both targets employeeOverviewTop and employeeOverviewContent as well as their parent target employeeOverview. On the parent target we set level to 2 to ensure a correct transition animation. In the targets, we also configure where the corresponding views of the children shall be displayed by setting the parameters controlId and controlAggregation to a control ID of a sap.ui.layout.HorizontalLayout that we are about to create in a new view.
The router makes sure that the parent view is loaded in addition to the target view when a corresponding route has been matched and the targets are displayed. The referenced views are displayed automatically at the configured place in the parent’s view, in our case in the content aggregation of the Page control. We have mentioned three different views that we still need to add to the app to make the configuration work:
-
EmployeeOverview -
EmployeeOverviewTop -
EmployeeOverviewContent
webapp/view/employee/overview/EmployeeOverview.view.xml (New)
<mvc:View
  controllerName="ui5.tutorial.navigation.controller.employee.overview.EmployeeOverview"
  xmlns="sap.m"
  xmlns:mvc="sap.ui.core.mvc">
  <Page
    id="EmployeeOverviewParent"
    title="{i18n>EmployeeOverview}"
    titleAlignment="Center"
    showNavButton="true"
    navButtonPress=".onNavBack"
    class="sapUiResponsiveContentPadding">
    <content>
      <!-- inserted by routing -->
    </content>
  </Page>
</mvc:View>
First we create the parent view by creating the folder overview under webapp/view/employee and placing the file EmployeeOverview.view.xml into that folder. This view contains a Page control that is referenced from the targets in our manifest.json descriptor file. The content aggregation of the page will be filled by the router with the top and content part when the corresponding route has been hit.
webapp/controller/employee/overview/EmployeeOverview.controller.ts/.js (New)
// webapp/controller/employee/overview/EmployeeOverview.controller.ts
import BaseController from "ui5/tutorial/navigation/controller/BaseController";

/**
 * @namespace ui5.tutorial.navigation.controller.employee.overview
 */
export default class EmployeeOverview extends BaseController {

}
// webapp/controller/employee/overview/EmployeeOverview.controller.js
sap.ui.define(["ui5/tutorial/navigation/controller/BaseController"], function (BaseController) {
	"use strict";

	const EmployeeOverview = BaseController.extend("ui5.tutorial.navigation.controller.employee.overview.EmployeeOverview", {});
	return EmployeeOverview;
});
The controller does not contain any logic yet, but we will add back navigation features here in the next steps.
webapp/view/employee/overview/EmployeeOverviewTop.view.xml (New)
<mvc:View xmlns="sap.m" xmlns:mvc="sap.ui.core.mvc" class="sapUiMediumMarginBottom">
  <Title text="{i18n>EmployeeOverviewTop}"/>
</mvc:View>
Create the file EmployeeOverviewTop.view.xml and place it in the webapp/view/employee/overview folder. This view displays a static text for illustration purposes. Change it according to your own requirements. We don’t need a controller for this view
webapp/view/employee/overview/EmployeeOverviewContent.view.xml (New)
<mvc:View
  controllerName="ui5.tutorial.navigation.controller.employee.overview.EmployeeOverviewContent"
  xmlns="sap.m"
  xmlns:mvc="sap.ui.core.mvc">
  <Table id="employeesTable"
    items="{/Employees}">
    <headerToolbar>
      <Toolbar>
        <Title text="{i18n>Employees}" level="H2"/>
        <ToolbarSpacer />
        <SearchField id="searchField" search=".onSearchEmployeesTable" width="50%"/>
        <Button icon="sap-icon://sort" press=".onSortButtonPressed"/>
      </Toolbar>
    </headerToolbar>
    <columns>
      <Column id="employeeIDCol"><Text text="{i18n>EmployeeID}"/></Column>
      <Column id="firstNameCol" demandPopin="true"><Text text="{i18n>FirstName}"/></Column>
      <Column id="lastNameCol" demandPopin="true"><Text text="{i18n>LastName}"/></Column>
      <Column id="addressCol" minScreenWidth="Tablet" demandPopin="true"><Text text="{i18n>Address}"/></Column>
      <Column id="cityCol" minScreenWidth="Tablet" demandPopin="true"><Text text="{i18n>City}"/></Column>
      <Column id="regionCol" minScreenWidth="Tablet" demandPopin="true"><Text text="{i18n>Region}"/></Column>
      <Column id="postalCodeCol" minScreenWidth="Tablet" demandPopin="true"><Text text="{i18n>PostalCode}"/></Column>
      <Column id="countryCol" minScreenWidth="Tablet" demandPopin="true"><Text text="{i18n>Country}"/></Column>
      <Column id="homePhoneCol" minScreenWidth="Tablet" demandPopin="true" hAlign="Right"><Text text="{i18n>Phone}"/></Column>
    </columns>
    <items>
      <ColumnListItem>
        <cells>
          <Text text="{EmployeeID}"/>
          <Text text="{FirstName}"/>
          <Text text="{LastName}"/>
          <Text text="{Address}"/>
          <Text text="{City}"/>
          <Text text="{Region}"/>
          <Text text="{PostalCode}"/>
          <Text text="{Country}"/>
          <Text text="{HomePhone}"/>
        </cells>
      </ColumnListItem>
    </items>
  </Table>
</mvc:View>
Create the file EmployeeOverviewContent.view.xml in the webapp/view/employee/overview folder. This view displays a responsive table with several columns containing employee data like Employee ID, First Name, Last Name and so on. In the headerToolbar, we add the SearchField and a Button. The SearchField in the header area allows to search in the table. The Button next to it opens a dialog to adjust the sorting of the table.
webapp/controller/employee/overview/EmployeeOverviewContent.controller.ts/.js (New)
// webapp/controller/employee/overview/EmployeeOverviewContent.controller.ts
import SearchField, { SearchField$SearchEvent } from "sap/m/SearchField";
import Table from "sap/m/Table";
import ViewSettingsDialog, { ViewSettingsDialog$ConfirmEvent } from "sap/m/ViewSettingsDialog";
import ViewSettingsItem from "sap/m/ViewSettingsItem";
import BaseController from "ui5/tutorial/navigation/controller/BaseController";
import Filter from "sap/ui/model/Filter";
import FilterOperator from "sap/ui/model/FilterOperator";
import ListBinding from "sap/ui/model/ListBinding";
import Sorter from "sap/ui/model/Sorter";

/**
 * @namespace ui5.tutorial.navigation.controller.employee.overview
 */
export default class EmployeeOverviewContent extends BaseController {

	private table: Table;
	private viewSettingsDialog: ViewSettingsDialog;
	private sortField: string | null = null;
	private sortDescending: boolean = false;
	private validSortFields: string[] = ["EmployeeID", "FirstName", "LastName"];
	private searchQuery: string | null = null;

	public onInit(): void {
		this.table = (<Table> this.byId("employeesTable"));
		this._initViewSettingsDialog();
	}

	public onSortButtonPressed(): void {
		this.viewSettingsDialog.open();
	}

	public onSearchEmployeesTable(event: SearchField$SearchEvent): void {
		this._applySearchFilter(event.getSource().getValue());
	}

	private _initViewSettingsDialog(): void {
		this.viewSettingsDialog = new ViewSettingsDialog("vsd", {
			confirm: (event: ViewSettingsDialog$ConfirmEvent) => {
				const sortItem = event.getParameter("sortItem");
				this._applySorter(sortItem.getKey(), event.getParameter("sortDescending"));
			}
		});

		// init sorting (with simple sorters as custom data for all fields)
		this.viewSettingsDialog.addSortItem(new ViewSettingsItem({
			key: "EmployeeID",
			text: "Employee ID",
			selected: true // by default the MockData is sorted by EmployeeID
		}));

		this.viewSettingsDialog.addSortItem(new ViewSettingsItem({
			key: "FirstName",
			text: "First Name",
			selected: false
		}));

		this.viewSettingsDialog.addSortItem(new ViewSettingsItem({
			key: "LastName",
			text: "Last Name",
			selected: false
		}));
	}

	private _applySearchFilter(searchQuery: string): void {
		// first check if we already have this search value
		if (this.searchQuery === searchQuery) {
			return;
		}
		this.searchQuery = searchQuery;
		(<SearchField> this.byId("searchField")).setValue(searchQuery);

		let filter: Filter | null = null;

		// add filters for search
		if (searchQuery?.length > 0) {
			const filters: Filter[] = [];

			filters.push(new Filter("FirstName", FilterOperator.Contains, searchQuery));
			filters.push(new Filter("LastName", FilterOperator.Contains, searchQuery));
			filter = new Filter({ filters: filters, and: false }); // OR filter
		}

		// update list binding
		const binding = (<ListBinding> this.table.getBinding("items"));
		binding.filter(filter, "Application");
	}

	/**
	 * Applies sorting on our table control.
	 * @param {string} fieldName the name of the field used for sorting
	 * @param {boolean} sortDescending whether to sort descending
	 * @private
	 */
	private _applySorter(fieldName: string, sortDescending: boolean): void {
		// only continue if we have a valid sort field
		if (fieldName && this.validSortFields.includes(fieldName)) {
			// sort only if the sorter has changed
			if (this.sortField && this.sortField === fieldName && this.sortDescending === sortDescending) {
				return;
			}

			this.sortField = fieldName;
			this.sortDescending = sortDescending;
			const sorter = new Sorter(fieldName, sortDescending);

			// sync with View Settings Dialog
			this._syncViewSettingsDialogSorter(fieldName, sortDescending);

			const binding = (<ListBinding> this.table.getBinding("items"));
			binding.sort(sorter);
		}
	}

	private _syncViewSettingsDialogSorter(sortField: string, sortDescending: boolean): void {
		// the possible keys are: "EmployeeID" | "FirstName" | "LastName"
		// Note: no input validation is implemented here
		this.viewSettingsDialog.setSelectedSortItem(sortField);
		this.viewSettingsDialog.setSortDescending(sortDescending);
	}
}
// webapp/controller/employee/overview/EmployeeOverviewContent.controller.js
sap.ui.define(["sap/m/ViewSettingsDialog", "sap/m/ViewSettingsItem", "ui5/tutorial/navigation/controller/BaseController", "sap/ui/model/Filter", "sap/ui/model/FilterOperator", "sap/ui/model/Sorter"], function (ViewSettingsDialog, ViewSettingsItem, BaseController, Filter, FilterOperator, Sorter) {
  "use strict";

  const EmployeeOverviewContent = BaseController.extend("ui5.tutorial.navigation.controller.employee.overview.EmployeeOverviewContent", {
	constructor() {
	  BaseController.prototype.constructor.apply(this, arguments);
	  this.sortField = null;
	  this.sortDescending = false;
	  this.validSortFields = ["EmployeeID", "FirstName", "LastName"];
	  this.searchQuery = null;
	},
	onInit() {
	  this.table = this.byId("employeesTable");
	  this._initViewSettingsDialog();
	},
	onSortButtonPressed() {
	  this.viewSettingsDialog.open();
	},
	onSearchEmployeesTable(event) {
	  this._applySearchFilter(event.getSource().getValue());
	},
	_initViewSettingsDialog() {
	  this.viewSettingsDialog = new ViewSettingsDialog("vsd", {
		confirm: event => {
		  const sortItem = event.getParameter("sortItem");
		  this._applySorter(sortItem.getKey(), event.getParameter("sortDescending"));
		}
	  });

	  // init sorting (with simple sorters as custom data for all fields)
	  this.viewSettingsDialog.addSortItem(new ViewSettingsItem({
		key: "EmployeeID",
		text: "Employee ID",
		selected: true // by default the MockData is sorted by EmployeeID
	  }));
	  this.viewSettingsDialog.addSortItem(new ViewSettingsItem({
		key: "FirstName",
		text: "First Name",
		selected: false
	  }));
	  this.viewSettingsDialog.addSortItem(new ViewSettingsItem({
		key: "LastName",
		text: "Last Name",
		selected: false
	  }));
	},
	_applySearchFilter(searchQuery) {
	  // first check if we already have this search value
	  if (this.searchQuery === searchQuery) {
		return;
	  }
	  this.searchQuery = searchQuery;
	  this.byId("searchField").setValue(searchQuery);
	  let filter = null;

	  // add filters for search
	  if (searchQuery?.length > 0) {
		const filters = [];
		filters.push(new Filter("FirstName", FilterOperator.Contains, searchQuery));
		filters.push(new Filter("LastName", FilterOperator.Contains, searchQuery));
		filter = new Filter({
		  filters: filters,
		  and: false
		}); // OR filter
	  }

	  // update list binding
	  const binding = this.table.getBinding("items");
	  binding.filter(filter, "Application");
	},
	/**
	 * Applies sorting on our table control.
	 * @param {string} fieldName the name of the field used for sorting
	 * @param {boolean} sortDescending whether to sort descending
	 * @private
	 */
	_applySorter(fieldName, sortDescending) {
	  // only continue if we have a valid sort field
	  if (fieldName && this.validSortFields.includes(fieldName)) {
		// sort only if the sorter has changed
		if (this.sortField && this.sortField === fieldName && this.sortDescending === sortDescending) {
		  return;
		}
		this.sortField = fieldName;
		this.sortDescending = sortDescending;
		const sorter = new Sorter(fieldName, sortDescending);

		// sync with View Settings Dialog
		this._syncViewSettingsDialogSorter(fieldName, sortDescending);
		const binding = this.table.getBinding("items");
		binding.sort(sorter);
	  }
	},
	_syncViewSettingsDialogSorter(sortField, sortDescending) {
	  // the possible keys are: "EmployeeID" | "FirstName" | "LastName"
	  // Note: no input validation is implemented here
	  this.viewSettingsDialog.setSelectedSortItem(sortField);
	  this.viewSettingsDialog.setSortDescending(sortDescending);
	}
  });
  return EmployeeOverviewContent;
});
Finally create the controller for the Employee Overview page in the webapp/controller/employee/overview folder. It basically sets up a ViewSettingsDialog to sort and filter the table of employees and implements event handlers for the search field and for the sorting of the table.
There is nothing special about this implementation. If you are interested in how to set up a table with sorting and filtering you can check the corresponding steps of the Walkthrough tutorial or the examples in the Demo Kit. We will mainly make use of the UI and the functionality for showing additional navigation and routing features. Therefore, we suggest copying the code and trying it out.
Open webapp/index.html#/employees/overview and check the new views. As you can see, the three views are wired together automatically by the router based on our configuration in the descriptor. In the top area of the page, you see a static text and below you see the table filled with data from our test service. The whole routing functionality that we see in this example is implemented by referencing two targets from one route.
Of course, you can also search the table and change the sorting. When the sorting dialog opens, it creates a block layer so that the back button and other controls cannot be accessed. However, you can still use the back button of the browser. As you can see, the dialog is closed automatically by the router before navigating.
📝 The default behavior of the
sap.mrouter is that all dialogs are closed when the hash changes (i.e. when callingnavTo,displayor pressing the back button of the browser). You can change this default behavior by callinggetTargetHandler().setCloseDialogs(false)on the router or on theTargetsobject.
However, we have one problem yet to solve: the search and table ordering are not bookmarkable. Fortunately, we have additional navigation features at hand and you will see how this works in the next steps
webapp/i18n/i18n.properties
...
EmployeeOverview=Employee Overview
ShowEmployeeOverview=Show Employees Overview
EmployeeOverviewTop=Employees Overview Top
Region=Region
EmployeeID=Employee ID
Phone=Phone
Employees=Employees
Add the new texts to the properties file.
Next: Step 12: Make a Search Bookmarkable
Previous: Step 10: Implement “Lazy Loading”