docs
Folder Structure: Where to Put Your Files
The details described here represent a best practice for structuring an application that features one component, one OData service and less than 20 views. If you’re building an app that has more components, OData services and views, you may have to introduce more folder levels than described here.
The Main Folders
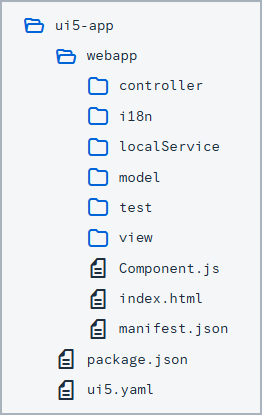
The main folders in an application are the root folder, the webapp folder and the test folder. You can name the root folder after your application, for example “ui5-app” in the example below.
Regarding their structure, the webapp folder should be inside the root folder, and the test folder should be located inside the webapp folder, as shown here:
The Root Folder
In addition to the webapp folder, the root folder should contain files that are not part of your application coding. Examples are build configuration files, such as a package.json for npm or a ui5.yaml for UI5 CLI, and documentation files like README.md or LICENSE.txt. These files may also be grouped in folders if needed. For example, you could group all your documentation files into a docs folder.
The webapp Folder
The webapp folder contains all the code that is related to the application. This includes the JavaScript/TypeScript files for the logic, view files written in xml, html, json or js format, and also files for localization, such as i18n.properties files. Any files that are only relevant for testing should be put inside the test folder. For more details on the webapp folder, see the section below. For more information about localization, see Localization.
The test Folder
The test folder contains all of the files needed for running automated tests for your application, as well as for launching your application for manual testing. For more details about the test folder, see the section below.
Why Use Separate Folders?
To achieve sound performance when loading your application, the code you deploy to your production servers should only contain a Component-preload.js and a manifest.json file. This means that when you create a package with a build, it is easier if all the files you really want to deploy are inside one folder. This is true no matter which build framework you use. We recommend using the webapp folder for this. None of the files inside the root folder are needed for running the app, so they won’t be deployed on a production server serving your application. The content of the test folder has to be executed in design time and during the automated test execution on a central server. We choose to include it inside the webapp folder to be able to reference resources of the webapp folder relative to the test folder. This folder has to be excluded when you are building a Component-preload.js. You should never reference resources of the test folder from your application, because when you deploy to a productive environment, this resource cannot be loaded. For more information about the manifest.json file, see Manifest (Descriptor for Applications, Components, and Libraries).
The webapp Folder in Detail
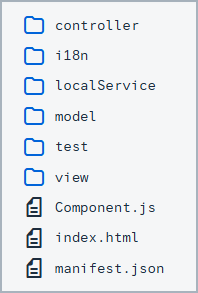
Aside from the test folder, the webapp folder contains 3 folders related to the MVC (model, view, controller) pattern used in OpenUI5, as well as a localization folder and a local-services folder used for emulating REST services. Each of these folders is outlined below.
For standalone apps, this folder also contains an index.html file that is used to start the app and to instantiate the component.
The view Folder
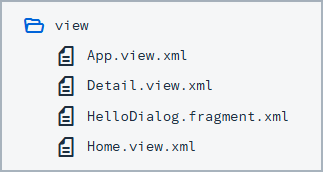
In the view folder, you should put all OpenUI5 views and fragments. This folder should not contain any application logic, so include no JavaScript/TypeScript files unless you make use of JavaScript/TypeScript views. We recommend using XML views wherever possible. JavaScript/TypeScript views could tempt you to mix in controller logic when building up a view, which is not possible with XML views. In the example shown below, the view folder contains a mixture of views and fragments. If this folder gets too big, you might consider adding subfolders to group views by their semantics. In this example for instance, you could add a detail folder and move all views that are related to the detail area of your application to this subfolder.
For more information about views and fragments, see Views and Reusing UI Parts: Fragments respectively.
The controller Folder
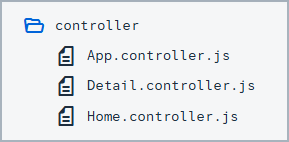
The controller folder contains all the controllers used by your views, and might also contain additional logic files that are used by one or more controllers. The structure of the controller folder should mirror the view folder. If a view is in a subfolder, the controller of the view should also be in the corresponding subfolder.
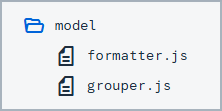
The model Folder
The model folder is where you put any logic relating to model data. This includes grouping, filtering and formatting data.
Localization Folder - i18n
We also have one dedicated folder for localization files. An OpenUI5 app will potentially be translated into many languages. Each of those languages has its own .properties file. Note that although the ResourceModel is an OpenUI5 model from a technical point of view, the localization folder is not part of the model folder. This is because the .properties files have a different semantic since they are used for translation. For more information about localization, see Localization. For more information about the ResourceModel, see the API Reference in the Demo Kit.
Note:
The path to the
i18nfile must not exceed 100 characters.
The localService Folder
The localService folder is used to emulate REST services such as OData for testing or as a preview mode for your application. If you make use of an OData service, it is also intended for design-time tools since it contains the metadata.xml file, which describes the back-end connection of your application. You need to have one metadata.xml file per OData service, which must exactly match the remote service’s metadata. The location of this file also needs to be maintained in the data sources section of the manifest.json file. For more information, see Manifest (Descriptor for Applications, Components, and Libraries).
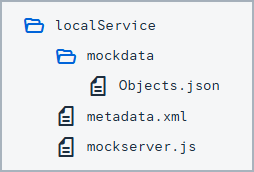
For integration tests, it is helpful if you are able to mock your back end with stable data. A second use case for this is for running an application in a preview mode so that it serves data locally instead of connecting to a back end. This is why this folder also contains files necessary for starting up the OData V2 mock server. The data served by the mock server is put inside the mockdata folder. If you need to, you can also include multiple sets of mock data here, by giving each set its own folder. For more information about the OData V2 mock server, see the API Reference in the Demo Kit.
For information about mock server functionality for OData V4, see OData V4 Mock Server.
The test Folder in Detail
test folder for standalone apps

The test folder contains three sets of files: files related to unit tests, files related to integration tests, and html files for either launching the tests or for testing the application manually. Inside the unit folder, the structure of the webapp folder is replicated for the files that are being tested.
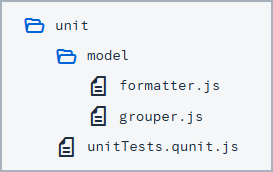
In this example shown above, the files being tested are webapp/model/formatter.js and webapp/model/grouper.js. You may be using JavaScript/TypeScript files for defining the tests, and files related to the Test Starter to execute your tests.
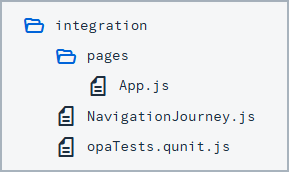
The integration folder contains the OPA5 tests of your application. We decided to separate our unit and integration tests, since the execution time of the integration tests is much longer. While the unit tests run in less than 10 seconds, the integration tests run for over 2 minutes. These times will vary a lot depending on the size of your project. If the project grows and grows, the difference in the execution time will also grow. For this reason, we recommend making both kind of tests separately executable so that developers can choose which sets of tests they want to run during design time.