docs
Step 9: Component Configuration (TypeScript)
After we have introduced all three parts of the Model-View-Controller (MVC) concept, we now come to another important structural aspect of OpenUI5.
In this step, we will encapsulate all UI assets in a component that is independent from our index.html file. Components are independent and reusable parts used in OpenUI5 applications. Whenever we access resources, we will now do this relatively to the component (instead of relatively to the index.html). This architectural change allows our app to be used in more flexible environments than our static index.html page, such as in a surrounding container like the SAP Fiori launchpad.
Preview
An input field and a description displaying the value of the input field (No visual changes to last step)

Coding
You can view all files at OpenUI5 TypeScript Walkthrough - Step 9: Component Configuration and download the solution as a zip file.
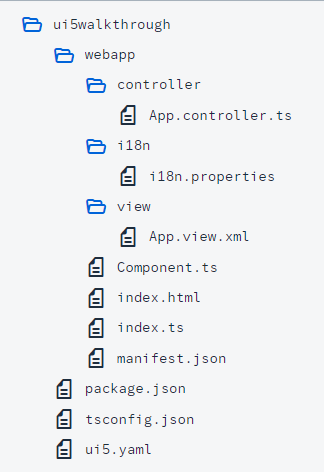
Folder Structure for this Step

After this step your project structure will look like the figure above. We’ll create the Component.ts file now and modify the related files in the app.
webapp/Component.ts (New)
We navigate to the webapp folder and place the Component.ts file into it. This file is commonly referred to as the component controller. A component is organized in a unique namespace (which is synonymous with the application namespace). All required and optional resources of the component have to be organized in the namespace of the component.
We define the component by extending sap/ui/core/UIComponent and supplement the component with additional metadata. Within the interfaces settings, we specify that the component should implement the sap/ui/core/IAsyncContentCreation interface. This allows the component to be generated asynchronously, which in turn sets the component’s rootView and router configuration to async.
When the component is instantiated, OpenUI5 automatically calls the init function of the component. It’s important to include a call to the init function of the base class by using the super keyword. In this section, we also instantiate our data model and the i18n model, similar to what we did earlier in the onInit function of our app controller.
Finally we call the createContent hook method of the component. This method creates the content (UI control tree) of this component. Here, we create the view as we did in the index.ts file to set our app view as the root view of the component.
import Control from "sap/ui/core/Control";
import UIComponent from "sap/ui/core/UIComponent";
import XMLView from "sap/ui/core/mvc/XMLView";
import JSONModel from "sap/ui/model/json/JSONModel";
import ResourceModel from "sap/ui/model/resource/ResourceModel";

/**
* @namespace ui5.walkthrough
*/
export default class Component extends UIComponent {
public static metadata = {
"interfaces": ["sap.ui.core.IAsyncContentCreation"]
};
    init(): void {
        // call the init function of the parent
        super.init();

        // set data model
        const data = {
            recipient: {
                name: "World"
            }
        };
        const dataModel = new JSONModel(data);
        this.setModel(dataModel);

        // set i18n model
        const i18nModel = new ResourceModel({
            bundleName: "ui5.walkthrough.i18n.i18n"
        });
        this.setModel(i18nModel, "i18n");
    };

    createContent(): Control | Promise<Control | null> | null {
        return XMLView.create({
            "viewName": "ui5.walkthrough.view.App",
            "id": "app"
        });
    };
};
Be aware that the models are set directly on the component and not on the root view of the component. However, as nested controls automatically inherit the models from their parent controls, the models are available on the view as well.
webapp/controller/App.controller.ts
We delete the onInit function and the required modules; this is now done in the component.
import MessageToast from "sap/m/MessageToast";
import Controller from "sap/ui/core/mvc/Controller";
import JSONModel from "sap/ui/model/json/JSONModel";
import ResourceModel from "sap/ui/model/resource/ResourceModel";
import ResourceBundle from "sap/base/i18n/ResourceBundle";

/**
 * @name ui5.walkthrough.controller.App
 */
export default class AppController extends Controller {
    onShowHello(): void {
        // read msg from i18n model
        const recipient = (<JSONModel> this.getView()?.getModel())?.getProperty("/recipient/name");
        const resourceBundle = <ResourceBundle> (<ResourceModel> this.getView()?.getModel("i18n"))?.getResourceBundle();
        const msg = resourceBundle.getText("helloMsg", [recipient]) || "no text defined";
        // show message
        MessageToast.show(msg);
    }
};
webapp\index.ts
We’ll replace the view with a UI component. To do this, we use a control called ComponentContainer. This control allows us to wrap a UI Component and place it in our HTML document. We configure this instance by providing the following options:
-
We assign the
idproperty to"container"so that we can refer to it later if needed. -
We set the
nameproperty to the namespace of the component. This tells theComponentContainercontrol which UI component it should load and show. -
We pass
id: "walkthrough"to our component through theComponentContainerconstructor’ssettingsargument. This ID helps us identify our component among others that may be created during the application’s runtime. -
To ensure the ID of our component is unique and avoid any mix-ups, we set the
autoPrefixIdproperty totrue. This automatically adds a prefix to the ID of the Component, which is the ID of the ComponentContainer followed by a single dash (”-”). -
For better loading performance, we set the
asyncproperty totrue. This allows the component and its dependencies to load in the background without blocking other parts of the application.
Finally, we position our newly created ComponentContainer control within the HTML element with the id content.
import ComponentContainer from "sap/ui/core/ComponentContainer";

new ComponentContainer({
    id: "container",
    name: "ui5.walkthrough",
    settings: {
        id: "walkthrough"
    },
    autoPrefixId: true,
    async: true
}).placeAt("content");
Conventions
-
The component is named
Component.js(JavaScript) orComponent.ts(in TypeScript). -
Together with all UI assets of the app, the component is located in the
webappfolder. -
The
index.htmlfile is located in thewebappfolder if it is used productively.
Parent topic:Walkthrough Tutorial (TypeScript)
Next:Step 8: Translatable Texts (TypeScript)
Previous:Step 10: Descriptor for Applications (TypeScript)
Related Information
Content Creation in Components