docs
Step 6: Adding a Floating Footer
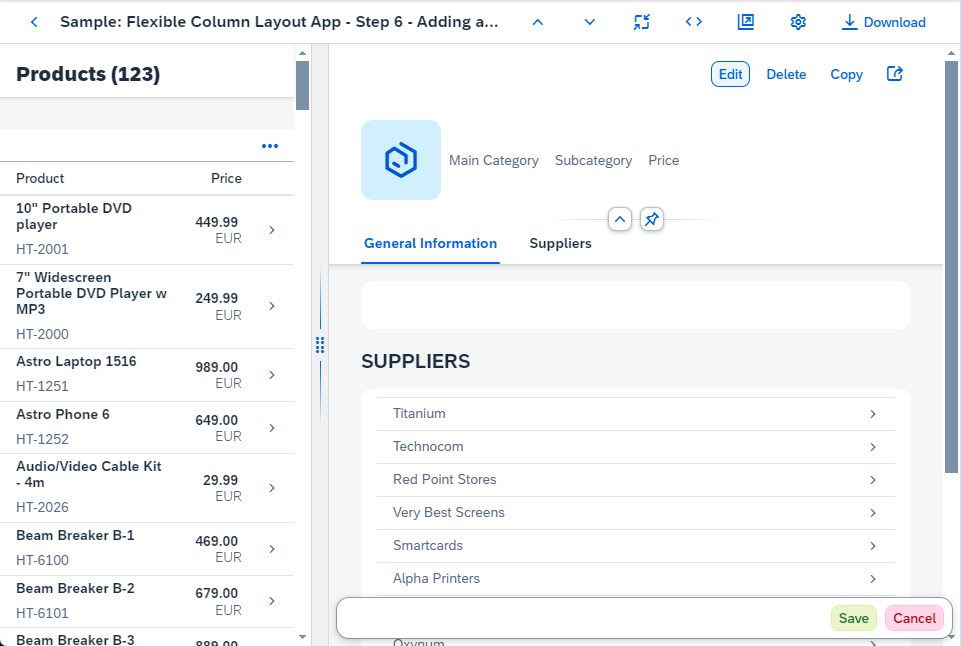
In this step, we add a floating footer to the detail page.
Preview
ObjectPageLayout with a floating footer
Coding
You can view and download all files at Flexible Column Layout App - Step 6.
webapp/view/App.view.xml [MODIFY]
<mvc:View
	displayBlock="true"
	height="100%"
	xmlns="sap.f"
	xmlns:mvc="sap.ui.core.mvc">
	<FlexibleColumnLayout id="flexibleColumnLayout" stateChange="onStateChanged" backgroundDesign="Solid">
		<beginColumnPages>
			<mvc:XMLView id="beginView" viewName="sap.ui.demo.fcl.view.List"/>
		</beginColumnPages>
		<midColumnPages>
			<mvc:XMLView id="detailView" viewName="sap.ui.demo.fcl.view.Detail"/>
		</midColumnPages>
	</FlexibleColumnLayout>
</mvc:View>
First, we communicate changes to the layout with the use of the stateChange event.
webapp/view/Detail.view.xml [MODIFY]
		...
		</sections>

		<footer>
			<m:OverflowToolbar>
				<m:ToolbarSpacer/>
				<m:Button type="Accept" text="Save"/>
				<m:Button type="Reject" text="Cancel"/>
			</m:OverflowToolbar>
		</footer>
	</ObjectPageLayout>
</mvc:View>
We add a footer inside the sap.uxap.ObjectPageLayout.
webapp/view/Detail.view.xml [MODIFY]
<mvc:View
	controllerName="sap.ui.demo.fcl.controller.Detail"
	xmlns="sap.uxap"
	xmlns:m="sap.m"
	xmlns:f="sap.f"
	xmlns:form="sap.ui.layout.form"
	xmlns:mvc="sap.ui.core.mvc">
	<ObjectPageLayout
		id="ObjectPageLayout"
		showTitleInHeaderContent="true"
		alwaysShowContentHeader="false"
		preserveHeaderStateOnScroll="false"
		headerContentPinnable="true"
		isChildPage="true"
		upperCaseAnchorBar="false">
		<headerTitle>
			<ObjectPageDynamicHeaderTitle>
				<actions>
					<m:ToggleButton
						text="Edit"
						type="Emphasized"
						press=".onEditToggleButtonPress"/>
					<m:Button
						text="Delete"
						type="Transparent"/>
					<m:Button
						text="Copy"
						type="Transparent"/>
					<m:Button
						icon="sap-icon://action"
						type="Transparent"/>
				</actions>
			</ObjectPageDynamicHeaderTitle>
		</headerTitle>
		...
We add a press event handler to the Edit button.
webapp/controller/Detail.controller.js [NEW]
sap.ui.define([
	"sap/ui/core/mvc/Controller"
], function (Controller) {
	"use strict";

	return Controller.extend("sap.ui.demo.fcl.controller.Detail", {
		onEditToggleButtonPress: function() {
			var oObjectPage = this.getView().byId("ObjectPageLayout"),
				bCurrentShowFooterState = oObjectPage.getShowFooter();

			oObjectPage.setShowFooter(!bCurrentShowFooterState);
		}
	});
});
Finally, we create the controller and add a simple function to it to show and hide the footer.
Parent topic:Flexible Column Layout App Tutorial
Next:Step 5: Using Object Page Layout as a Detail Page
Previous:Step 7: Routing