docs
Step 4: Filtering, Sorting, and Counting
In this step, we add features to filter, sort, and count the user data by using the OData V4 model API to apply OData system query options $filter, $orderby, and $count.
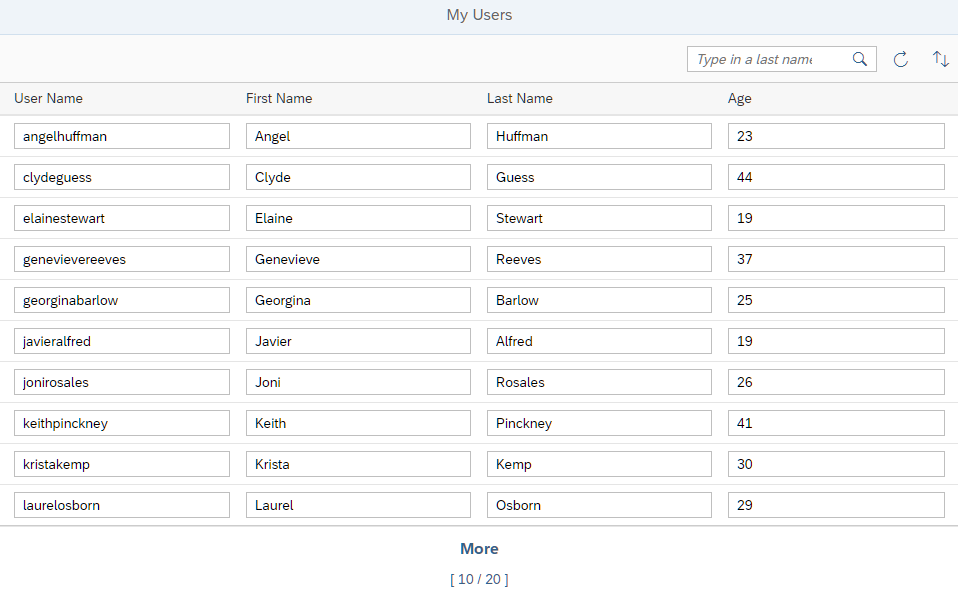
Preview
App now has a search field, the entries can be sorted, and you can see how many entities are loaded and how many more are available

Coding
You can view and download all files at OData V4 - Step 4.
webapp/controller/App.controller.js
sap.ui.define([
	"sap/ui/core/mvc/Controller",
	"sap/m/MessageToast",
	"sap/m/MessageBox",
	"sap/ui/model/Sorter",
	"sap/ui/model/Filter",
	"sap/ui/model/FilterOperator",
	"sap/ui/model/FilterType",
	"sap/ui/model/json/JSONModel"
], function (Controller, MessageToast, MessageBox, Sorter, Filter, FilterOperator, FilterType, JSONModel) {
	"use strict";

	return Controller.extend("sap.ui.core.tutorial.odatav4.controller.App", {

		onInit : function () {
			var oJSONData = {
				busy : false,
				order : 0
			};
			var oModel = new JSONModel(oJSONData);
			this.getView().setModel(oModel, "appView");
		},

		onRefresh : function () {
		...
		},

						onSearch : function () {
			var oView = this.getView(),
				sValue = oView.byId("searchField").getValue(),
				oFilter = new Filter("LastName", FilterOperator.Contains, sValue);

			oView.byId("peopleList").getBinding("items").filter(oFilter, FilterType.Application);
		},

		onSort : function () {
			var oView = this.getView(),
				aStates = [undefined, "asc", "desc"],
				aStateTextIds = ["sortNone", "sortAscending", "sortDescending"],
				sMessage,
				iOrder = oView.getModel("appView").getProperty("/order");

			iOrder = (iOrder + 1) % aStates.length;
			var sOrder = aStates[iOrder];

			oView.getModel("appView").setProperty("/order", iOrder);
			oView.byId("peopleList").getBinding("items").sort(sOrder && new Sorter("LastName", sOrder === "desc"));

			sMessage = this._getText("sortMessage", [this._getText(aStateTextIds[iOrder])]);
			MessageToast.show(sMessage);
			},

		_getText : function (sTextId, aArgs) {
		...
		}
	});
});
We add the onSearch and onSort event handlers for the Search field and the Sort button to the controller. We also enhance the appView model to store the active sorting order.
The onSearch event handler filters the table for people whose last name contains any string value entered in the Search field. We define a sap.ui.model.Filter and apply it to the binding of the Table using the filter method. The binding will then automatically retrieve filtered data from the OData V4 service and update the Table.
When the request is triggered, only entities that match the given filter criteria are requested from the OData V4 service.
Note:
Filters of OData services are case-sensitive. If you prefer a non case-sensitive search, implement it in the controller logic.
The onSort event handler requests the data unordered, or in ascending order, or descending order. Each time the Sort button is clicked, the next sort order is applied. The sorting is applied to the table by calling the sort method of the list binding with a new sap.ui.model.Sorter.
Note:
The features of filtering and sorting can also be combined.
We add the order property to variable oJSONData in onInit method. This property stores the current sort order.
webapp/view/App.view.xml
<mvc:View
	controllerName="sap.ui.core.tutorial.odatav4.controller.App"
	displayBlock="true"
	xmlns="sap.m"
	xmlns:mvc="sap.ui.core.mvc">
	<Shell>
		<App busy="{appView>/busy}" class="sapUiSizeCompact">
			<pages>
				<Page title="{i18n>peoplePageTitle}">
					<content>
						<Table
							id="peopleList"
							growing="true"
							growingThreshold="10"
							items="{
								path: '/People',
								parameters: {
									$count: true
								}
							}">
							<headerToolbar>
								<OverflowToolbar>
									<content>
										<ToolbarSpacer/>
										<SearchField
											id="searchField"
											width="20%"
											placeholder="{i18n>searchFieldPlaceholder}"
											search=".onSearch"/>
										<Button
											id="refreshUsersButton"
											icon="sap-icon://refresh"
											tooltip="{i18n>refreshButtonText}"
											press=".onRefresh"/>
										<Button
											id="sortUsersButton"
											icon="sap-icon://sort"
											tooltip="{i18n>sortButtonText}"
											press="onSort"/>
									</content>
								</OverflowToolbar>
							</headerToolbar>
							<columns>
								<Column id="userNameColumn">
									<Text text="{i18n>userNameLabelText}"/>
								</Column>
								<Column id="firstNameColumn">
									<Text text="{i18n>firstNameLabelText}"/>
								</Column>
								<Column id="lastNameColumn">
									<Text text="{i18n>lastNameLabelText}"/>
								</Column>
								<Column id="ageColumn">
									<Text text="{i18n>ageLabelText}"/>
								</Column>
							</columns>
							<items>
								<ColumnListItem>
									<cells>
										<Input value="{UserName}"/>
									</cells>
									<cells>
										<Input value="{FirstName}"/>
									</cells>
									<cells>
										<Input value="{LastName}"/>
									</cells>
									<cells>
										<Input value="{Age}"/>
									</cells>
								</ColumnListItem>
							</items>
						</Table>
					</content>
				</Page>
			</pages>
		</App>
	</Shell>
</mvc:View>
We add the $count : true parameter to tell the OData service to send the number of entities. With this setting, we automatically get the full number of entities (20) and the number of displayed entities (10) beneath the More button.
Note:
The live TripPin service does not support the
$countparameter yet. If you use the live service instead of the mock server, as described in Step 2, leave out the$countparameter.
In the OverflowToolbar, we add a Search field and a Sort button with their events.
webapp/i18n/i18n.properties
...
#XTOL: Tooltip for refresh data
refreshButtonText=Refresh Data

#XTOL: Tooltip for sort
sortButtonText=Sort by Last Name

#XTXT: Placeholder text for search field
searchFieldPlaceholder=Type in a last name
...
# Messages
...
#XMSG: Message for refresh succeeded
refreshSuccessMessage=Data refreshed

#MSG: Message for sorting
sortMessage=Users sorted by {0}

#MSG: Suffix for sorting by LastName, ascending
sortAscending=last name, ascending

#MSG: Suffix for sorting by LastName, descending
sortDescending=last name, descending

#MSG: Suffix for no sorting
sortNone=the sequence on the server
We add the missing texts to the properties file.
Parent topic:OData V4 Tutorial
Next:Step 3: Automatic Data Type Detection
Previous:Step 5: Batch Groups
Related Information
Query Options under Querying Data in the Basic Tutorial on the OData home page