docs
Step 37: Accessibility (TypeScript)
In this step we’re going to improve the accessibility of our app.
To achieve this, we will add ARIA attributes. ARIA attributes are used by screen readers to recognize the application structure and to interpret UI elements properly. That way, we can make our app more accessible for users who are limited in their use of computers, for example visually impaired persons. The main goal here is to make our app usable for as many people as we can.
Tip:
ARIA is short for Accessible Rich Internet Applications. It is a set of attributes that enable us to make apps more accessible by assigning semantic characteristics to certain elements. For more information, see Accessible Rich Internet Applications (ARIA) – Part 1: Introduction.
Preview
Landmarks in our app

Coding
You can view all files at OpenUI5 TypeScript Walkthrough - Step 37: Accessibility and download the solution as a zip file.
One part of the ARIA attribute set are the so-called landmarks. You can compare landmarks to maps in that they help the user navigate through an app. For this step, we will use Google Chrome with a free landmark navigation extension We will now add meaningful landmarks to our code.
webapp/i18n/i18n.properties
We add the labels we will need for the ARIA regions in the ovierview iew to the text bundle.
# App Descriptor
appTitle=Hello World
appDescription=A simple walkthrough app that explains the most important concepts of UI5

#Overview Page
Overview_rootLabel=Overview Page
Overview_headerLabel=Header
Overview_contentLabel=Page Content

# Hello Panel
...
webapp/view/Overview.view.xml
We add the landmarkInfo aggregation to the page and use sap.m.PageAccessibleLandmarkInfo to define ARIA roles and labels for the overview page areas. In the PageAccessibilityLandmarkInfo control we specify a role and a title for the root, the content, and the header of the page.
For more information, see the API Reference: sap.m.PageAccessibleLandmarkInfo.
<mvc:View
    controllerName="ui5.walkthrough.controller.App"
    xmlns="sap.m"
    xmlns:mvc="sap.ui.core.mvc"
    displayBlock="true">
    <Page title="{i18n>homePageTitle}">
        <landmarkInfo>
            <PageAccessibleLandmarkInfo
                rootRole="Region"
                rootLabel="{i18n>Overview_rootLabel}"
                contentRole="Main"
                contentLabel="{i18n>Overview_contentLabel}"
                headerRole="Banner"
                headerLabel="{i18n>Overview_headerLabel}"/>
        </landmarkInfo>
        <content>
            <mvc:XMLView viewName="ui5.walkthrough.view.HelloPanel"/>
            <mvc:XMLView viewName="ui5.walkthrough.view.InvoiceList"/>
        </content>
    </Page>
</mvc:View>
webapp/view/InvoiceList.view.xml
We add an sap.m.Panel around the invoice list and move the toolbar from the table into the panel, so that the region can take the title of the toolbar as its own. This has the effect that it will now be a region in our landmarks.
<mvc:View
    controllerName="ui5.walkthrough.controller.InvoiceList"
    xmlns="sap.m"
    xmlns:mvc="sap.ui.core.mvc">
    <Panel accessibleRole="Region">
        <headerToolbar>
            <Toolbar>
                <Title text="{i18n>invoiceListTitle}"/>
                <ToolbarSpacer/>
                <SearchField
                    width="50%"
                    search=".onFilterInvoices"/>
            </Toolbar>
        </headerToolbar>
        <Table
            id="invoiceList"
            class="sapUiResponsiveMargin"
            width="auto"
            items="{
                path : 'invoice>/Invoices',
                sorter : {
                    path : 'ShipperName',
                    group : true
                }
            }">
            <columns>
                <Column
                    hAlign="End"
                    ...
            </columns>
            ...
        </Table>
    </Panel>
</mvc:View>
webapp/view/HelloPanel.view.xml
In the HelloPanel view, we already have a panel, so we just add the accessibleRole attribute.
<mvc:View
    controllerName="ui5.walkthrough.controller.HelloPanel"
    xmlns="sap.m"
    xmlns:mvc="sap.ui.core.mvc">
    <Panel
        headerText="{i18n>helloPanelTitle}"
        class="sapUiResponsiveMargin"
        width="auto"
        expandable="{device>/system/phone}"
        expanded="{= !${device>/system/phone} }"
        accessibleRole="Region">
        …
    </Panel>
</mvc:View>
Result
| 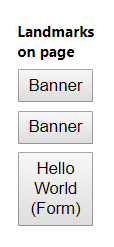 | 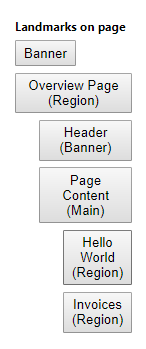 |
| **Landmarks on the overview page - before** | **Landmarks on the overview page - after** |
As you can see, we now have four landmarks on our page. The top three landmarks structure our page:
-
Overview Page marks the complete page.
-
Header marks the page title.
-
Page Content marks the content of our page. This landmark already has two children.
Parent topic:Walkthrough Tutorial (TypeScript)
Next:Step 36: Content Density (TypeScript)
Previous:Step 38: Build Your Application (TypeScript)
Related Information