docs
Step 15: Aggregation Binding Using a Factory Function
Instead of using a single hard-coded template control, we now opt for a factory function to generate different controls based on the data received at runtime. This approach is much more flexible and allows for the display of complex or heterogeneous data.
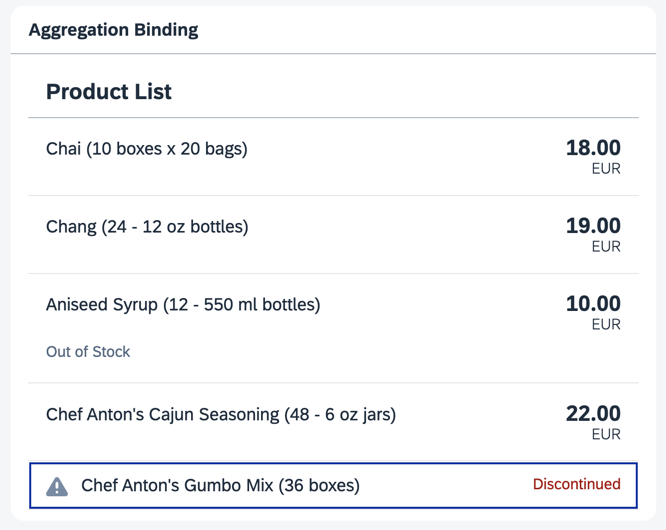
Preview
A different type of list item is displayed for a discontinued product

Coding
You can view and download all files in the Demo Kit at Data Binding - Step 15.
-
Create a
ProductSimple.fragment.xmlfile in theviewfolder. Here, define ansap.m.StandardListItemthat is used when the stock level is zero and the product is discontinued. In this simple use case, you only need to define a warning icon and a “Product Discontinued” message in theinfoproperty.webapp/view/ProductSimple.fragment.xml (New)
<core:FragmentDefinition xmlns="sap.m" xmlns:core="sap.ui.core"> <StandardListItem id="productSimple" icon="sap-icon://warning" title="{products>ProductName} ({products>QuantityPerUnit})" info="{i18n>Discontinued}" type="Active" infoState="Error" press=".onItemSelected"> </StandardListItem> </core:FragmentDefinition> -
Create a new
ProductExtended.fragment.xmlfile in theviewfolder. In this extended use case, you create anObjectListItemto display more product details. The properties are bound to the fields of the current data binding context. This allows the use of types, formatters, and all handlers defined in the assigned controller. However, you can’t define more complex logic declaratively in XML. Therefore, we add a singlesap.m.ObjectAttributein a factory function of the controller using JavaScript, which displays an “Out of Stock” message when the stock level is zero.webapp/view/ProductExtended.fragment.xml (New)
<core:FragmentDefinition xmlns="sap.m" xmlns:core="sap.ui.core" core:require="{Currency: 'sap/ui/model/type/Currency'}"> <ObjectListItem id="productExtended" title="{products>ProductName} ({products>QuantityPerUnit})" number="{ parts: [ {path: 'products>UnitPrice'}, {path: '/currencyCode'} ], type: 'Currency', formatOptions : { showMeasure : false } }" type="Active" numberUnit="{/currencyCode}" press=".onItemSelected"> </ObjectListItem> </core:FragmentDefinition> -
In the
App.view.xmlfile, add an XML namespace forsap.ui.core. Then, remove theitemsaggregation from thesap.m.ListXML element. Add anidattribute to thesap.m.Listand include the factory function in the items’ binding definition. Lastly, add the two newly created fragments as dependents to thesap.m.List.webapp/view/App.view.xml
<mvc:View
	controllerName="ui5.databinding.controller.App"
	xmlns="sap.m"
	xmlns:core="sap.ui.core"
	xmlns:form="sap.ui.layout.form"
	xmlns:l="sap.ui.layout"
	xmlns:mvc="sap.ui.core.mvc"
	core:require="{Currency: 'sap/ui/model/type/Currency'}">
...
	<Panel headerText="{i18n>panel3HeaderText}" class="sapUiResponsiveMargin" width="auto">
		<List
			id="ProductList"
			headerText="{i18n>productListTitle}"
			items="{
				path: 'products>/Products',
				factory: '.productListFactory'
			}">
			<dependents>
				<core:Fragment fragmentName="ui5.databinding.view.ProductSimple" type="XML"/>
				<core:Fragment fragmentName="ui5.databinding.view.ProductExtended" type="XML"/>
			</dependents>
		</List>
	</Panel>
...
</mvc:View>
The
sap.m.Listthat previously held the product list is now just a named, but otherwise empty placeholder. Without a factory function to populate it, thisListwould always remain empty. As the fragments are declared as dependents, they also inherit the controller of the view. This means that theonItemSelectfunction of theApp.controller.jscan still be used in theProductExtended.fragment.xml. -
In the
App.controller.jsfile, add a new import for thesap.m.ObjectAttributeclass and create a new function calledproductListFactory. This factory function returns a control for the associated binding context, similar to the XML templates we’ve defined in the previous steps. The controls returned by this factory function must suit the items aggregation of thesap.m.Listobject. In this case, it returns either ansap.m.StandardListItemor ansap.m.ObjectListItembased on the data stored in the context of the item to be created.webapp/controller/App.controller.js
sap.ui.define([
	"sap/m/library",
	"sap/m/ObjectAttribute",
	"sap/ui/core/mvc/Controller",
	"sap/ui/model/type/Currency"
], (mobileLibrary, ObjectAttribute, Controller, Currency) => {
	...
		productListFactory(sId, oContext) {
			let oUIControl;

			// Decide based on the data which dependent to clone
			if (oContext.getProperty("UnitsInStock") === 0 && oContext.getProperty("Discontinued")) {
				// The item is discontinued, so use a StandardListItem
				oUIControl = this.byId("productSimple").clone(sId);
			} else {
				// The item is available, so we will create an ObjectListItem
				oUIControl = this.byId("productExtended").clone(sId);

				// The item is temporarily out of stock, so we will add a status
				if (oContext.getProperty("UnitsInStock") < 1) {
					oUIControl.addAttribute(new ObjectAttribute({
						text : {
							path: "i18n>outOfStock"
						}
					}));
				}
			}

			return oUIControl;
		}

	});
});
The function decides which type of control to return by checking the current stock level and whether the product is discontinued. For both options, it loads and clones the respective XML fragment, which allows the view logic to be defined dynamically. If the stock level is zero and the product is discontinued, the
ProductSimpleXML fragment is used. Otherwise, theProductExtendedXML fragment is used.For each item of the list, the corresponding control is cloned. This method creates a fresh copy of a control that can be bound to the context of the list item. Remember, in a factory function you are responsible for the life cycle of the control you create.
If the product is not discontinued but the stock level is zero, we’re temporarily out of stock. In this case, a single
sap.m.ObjectAttributeis added to the cloned control. The “Out of Stock” message is bound to thesap.m.ObjectAttribute’stextproperty using JavaScript. Like declarative definitions in the XML view or fragments, you can bind properties using data binding syntax. Here, the text is bound to an entry in the resource bundle. Since thesap.m.ObjectAttributeis a child of the list item, it has access to all assigned models and the current binding context.Finally, the function returns the control that is then displayed inside the list.
-
Lastly, add the new texts to the
i18n.propertiesandi18n_de.propertiesfiles.webapp/i18n/i18n.properties
...
# Product Details
...
outOfStock=Out of Stock
webapp/i18n/i18n_de.properties
...
# Product Details
...
outOfStock=Nicht vorr\u00e4tig
Congratulations! You’ve completed the Data Binding tutorial.
Parent topic:Data Binding Tutorial
Next:Step 14: Expression Binding
Related Information
List Binding (Aggregation Binding)
[Using Factory Functions](../04_Essentials/using-factory-functions-335848a.md “”)