docs
Step 10: Property Formatting Using Data Types
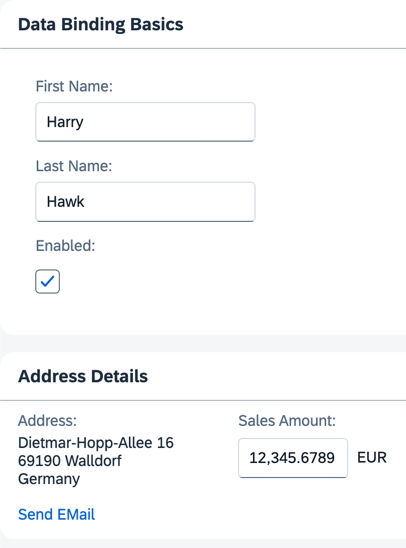
OpenUI5 offers a set of simple data types, including Boolean, Currency, Date and Float. You can apply these data types to controls to ensure that the value displayed on the screen is formatted correctly. If the field is open for input, this also ensures that the user input meets the requirements of that data type. Let’s add a new field called Sales Amount of type Currency.
Preview
An input field for a currency amount is added to the second panel

Coding
You can view and download all files in the Demo Kit at Data Binding - Step 10.
-
Add two new JSON model properties,
salesAmountandcurrencyCode, to thedata.jsonfile.webapp/model/data.json
{ "firstName": "Harry", "lastName": "Hawk", "enabled": true, "address": { "street": "Dietmar-Hopp-Allee 16", "city": "Walldorf", "zip": "69190", "country": "Germany" }, "salesAmount": 12345.6789, "currencyCode": "EUR" } -
Add the highlighted XML code to the
App.view.xmlfile.webapp/view/App.view.xml
<mvc:View controllerName="ui5.databinding.controller.App" xmlns="sap.m" xmlns:core="sap.ui.core" xmlns:form="sap.ui.layout.form" xmlns:l="sap.ui.layout" xmlns:mvc="sap.ui.core.mvc" core:require="{Currency: 'sap/ui/model/type/Currency'}"> <Panel headerText="{i18n>panel1HeaderText}" class="sapUiResponsiveMargin" width="auto"> <form:SimpleForm editable="true" layout="ColumnLayout"> <Label text="{i18n>firstName}"/> <Input value="{/firstName}" valueLiveUpdate="true" width="200px" enabled="{/enabled}"/> <Label text="{i18n>lastName}"/> <Input value="{/lastName}" valueLiveUpdate="true" width="200px" enabled="{/enabled}"/> <Label text="{i18n>enabled}"/> <CheckBox selected="{/enabled}"/> </form:SimpleForm> </Panel> <Panel headerText="{i18n>panel2HeaderText}" class="sapUiResponsiveMargin" width="auto"> <content> <l:HorizontalLayout> <l:VerticalLayout> <Label labelFor="address" text="{i18n>address}:"/> <FormattedText class="sapUiSmallMarginBottom" htmlText="{/address/street}<br>{/address/zip} {/address/city}<br>{/address/country}" id="address" width="200px"/> <Link href="{ parts: [ '/firstName', '/lastName' ], formatter: '.formatMail' }" text="{i18n>sendEmail}"/> </l:VerticalLayout> <l:VerticalLayout> <Label labelFor="salesAmount" text="{i18n>salesAmount}:"/> <Input description="{/currencyCode}" enabled="{/enabled}" id="salesAmount" value="{ parts: [ {path: '/salesAmount'}, {path: '/currencyCode'} ], type: 'Currency', formatOptions: {showMeasure: false} }" width="200px"/> </l:VerticalLayout> </l:HorizontalLayout> </content> </Panel> </mvc:View>We’ve created a new pair of
LabelandInputelements for thesalesAmountmodel property. The description property of theInputelement is bound to thecurrencyCodemodel property. The value property of theInputelement is bound to the model propertiessalesAmountandcurrencyCode. The{showMeasure: false}parameter switches off the display of the currency symbol within the input field itself. This isn’t necessary because the currency symbol is displayed using theInputelement’s description property. -
Add the highlighted texts to the
propertiesfiles. Remember, you need to enter special characters (non-Latin-1) using Unicode escape characters.webapp/i18n/i18n.properties
# Field labels
firstName=Vorname
lastName=Nachname
enabled=Enabled
address=Address
salesAmount=Sales Amount
...
webapp/i18n/i18n_de.properties
# Field labels
firstName=Vorname
lastName=Nachname
enabled=Aktiviert
address=Adresse
salesAmount=Verk\u00e4ufe bis zum heutigen Datum
...
Parent topic:Data Binding Tutorial
Next:Step 9: Formatting Values
Previous:Step 11: Validation Using sap/ui/core/Messaging
Related Information