docs
Step 1: Creating the Initial App
In this step, we set up the initial app.
Preview
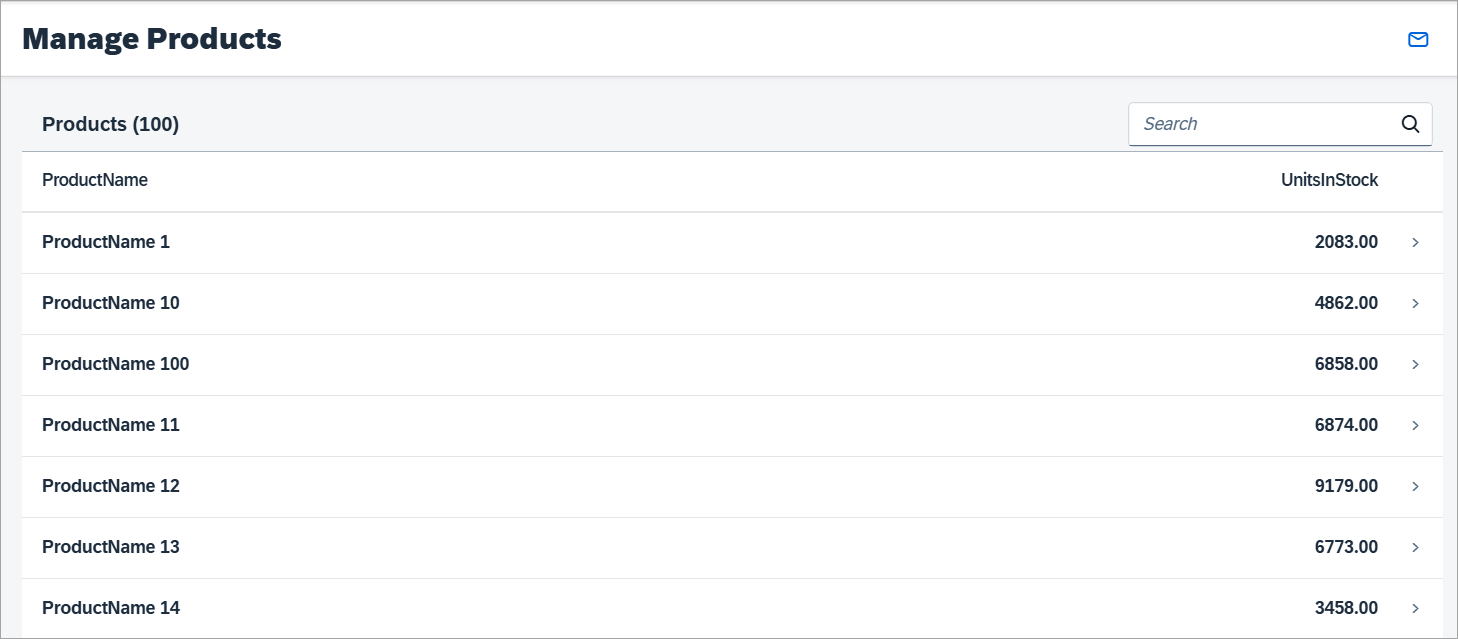
The worklist app

Setup
-
To set up your project for this tutorial, download the files at Worklist App - Step 1.
- Extract the downloaded
.zipfile at the desired location on your local machine. - Open a shell in the extracted folder and execute
npm install. - Execute
npm startto start the web server and to open a new browser window hostingtest/mockServer.html.
Note:
The texts in the
i18n.propertiesfile are automatically generated based on the template Customizing (OData entity set, entities, properties, and texts). The result can be incorrect texts like “Enter an <Products> name or a part of it.” You should therefore revise the generated texts in thei18n.propertiesfile.
Structure
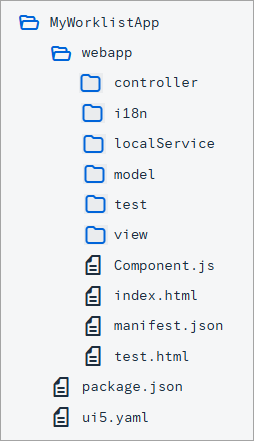
With the downloaded code from the Demo Kit, you have an initial app structure with the following content inside the webapp folder:
Folder structure of the initial project

-
Home Page (
webapp/view/Worklist.view.xmlfile)The home page of the app shows a table of products including the corresponding number of units in the stock. The title of the table shows how many items are available. A search field in the header toolbar of the table allows you to search for a product by name. Pressing a table row navigates the user to a new page that shows the details of the pressed product.
-
Data
You can run the app with the real service or with the mock server serving mock data. In the
webapp/localService/mockserver.jsfile, the mock server is configured. Using the mock server in this tutorial allows us to easily run the code even without network connection and without the need of having a remote server for our application data. To run the app with the mock server and its corresponding mock data the/webapp/test/mockServer.htmlfile has to be called in the browser.The
webapp/localService/metadata.xmlfile is used by the mock server to describe our OData service. In this step, the mock server will generate mock data based on this file. In a subsequent step the mock server will use our own custom mock data. -
Configuration of the App
In the
webapp/manifest.jsondescriptor file, we configure our app. The descriptor file contains the following relevant sections:-
sap.appIn this section we reference an
i18n.propertiesfile and use a special syntax to bind the texts for the title and description properties. In thedataSourcessection, we tell our app where to find ourmainServiceOData service. As you might guess, the URI correlates to therootUriof our mock server instance, which can be found inwebapp/localService/mockserver.js. It is important that these two paths match to allow our mock server to provide the test data we defined above. -
sap.ui5In the
sap.ui5section, we declare with therootViewparameter that ourmycompany.myapp.MyWorklistApp.view.Appview shall be loaded and used as therootViewfor our app.Furthermore, we define two models to be automatically instantiated and bound to the component: an
i18nmodel and a default model"". The latter references ourmainServicedataSource, which is declared in oursap.appsection as an OData 2.0 data source. Thei18nfile can be found atwebapp/i18n/i18n.properties. ThemainServicedata source will be mocked by our mock server.
Note:
There is a
test.htmlfile in thewebappfolder. This file serves as an easy entry point for developers to run and test the app in various ways during development. It contains links to the relevant files inside thetestfolder, which you can use to run with the Mock Server or to run unit tests and OPA tests. -
Parent topic:Worklist App Tutorial
Previous:Step 2: Custom Mock Data
Related Information